DragonBoard Bringup
This section covers the three images that you need to prepare and transfer to the board.
First, you will update the firmware image with the correct binary blobs, then update the boot image with the rebuilt kernel image from step 2. Then, you will flash both the firmware and boot images onto the onboard eMMC memory using fastboot.
Finally, you will install the root filesystem on the SD card. Depending on your Ubuntu setup, you may need to use the workaround from section 3.2 if you experience problems copying the filesystem to an SD card while on a Virtual Machine.
Download the Images
First, download and unzip the three images provided by Linaro. We will need to alter these images before flashing to the board.
Go to Linaro's website and download the following three files:
boot-ifc6410-20140526-15.img.gz

firmware-ifc6410-20140526-15.img.gz

linaro-trusty-gnome-ifc6410-20140526-15.img.gz
Unzip the compressed files:
gunzip *.img.gz
Update the Firmware Image with Proprietary BSP
This section will use the provided proprietary Board Support Package. This will be provided by the instructors on the Ted Website, which requires your login. Only those in the class are permitted to access this file.
We need to update the firmware with the proprietary binary blobs obtained from the Inforce TechWeb website. They are located in the file called Inforce-IFC6410_Android BSP Rel V 1.5.zip. First, unzip the file by running:
unzip Inforce-IFC6410_AndroidBSP_880160_Rel_Beta_V1.5.zip
Copy the file proprietary.tar.gz from the Inforce-IFC6410_AndroidBSP_880160_Rel_Beta_V1.5/source/ folder into the same folder as your firmware image.
Run the following commands from that folder:
mkdir image
sudo mount -o loop firmware-ifc6410-${VERSION}.img image
sudo tar xzf proprietary.tar.gz -C image/ --strip-components 8 proprietary/prebuilt/target/product/msm8960/system/etc/firmware/
sudo umount image
rmdir image
The firmware image firmware-ifc6410-20140526-15.img now has been updated with the binary blobs and is ready to flash onto the board. (See Linaro's website for a more detailed explanation.)
Update Linaro Boot Image with Rebuilt Kernel Image
Copy the kernel compressed image (zImage) from kernel/arch/arm/boot into the same folder as the Boot Image.
Update the Boot Image with the custom zImage:
abootimg -u boot-ifc6410-20140526-15.img -k zImage
Update the bootargs to use the SD card as the root filesystem:
abootimg -u boot-ifc6410-20140526-15.img -c "cmdline=console=ttyHSL0,115200n8 root=/dev/mmcblk1p1 rootwait rw"
/dev/mmcblk1p1 specifies that the device will boot from the SD card.
Now the Boot Image is ready to be flashed onto the board.
Booting the DragonBoard into Fastboot
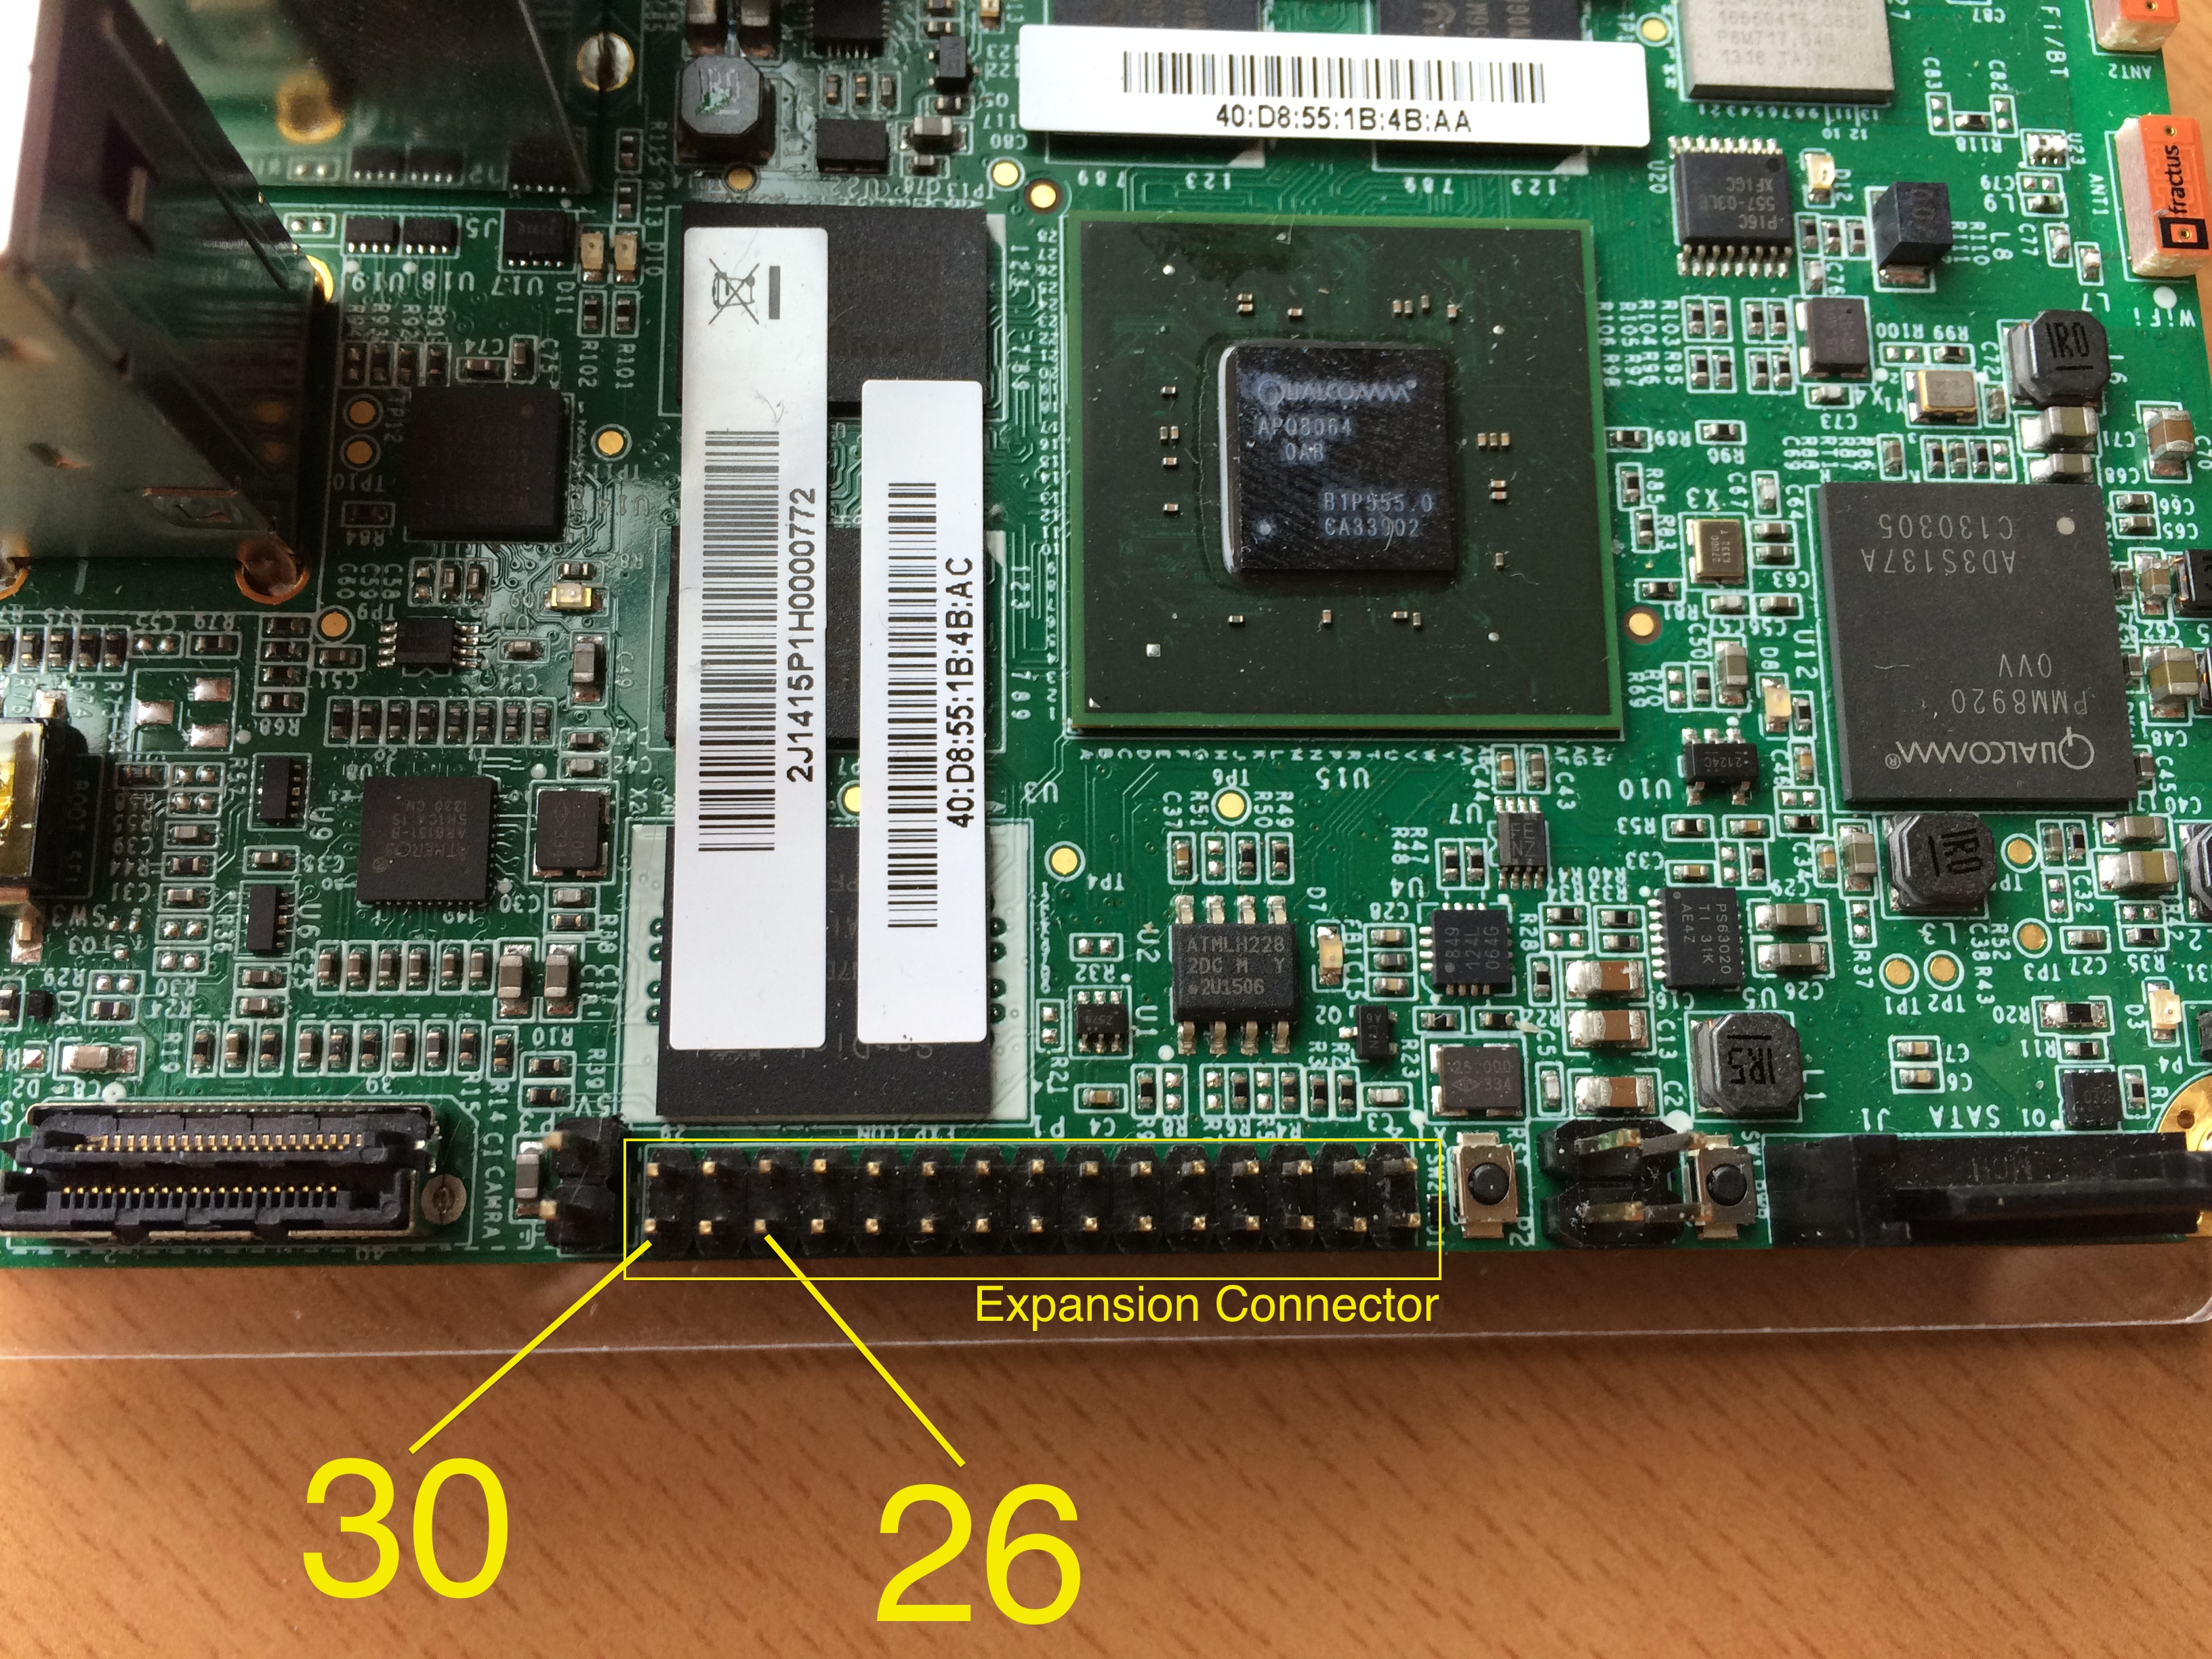
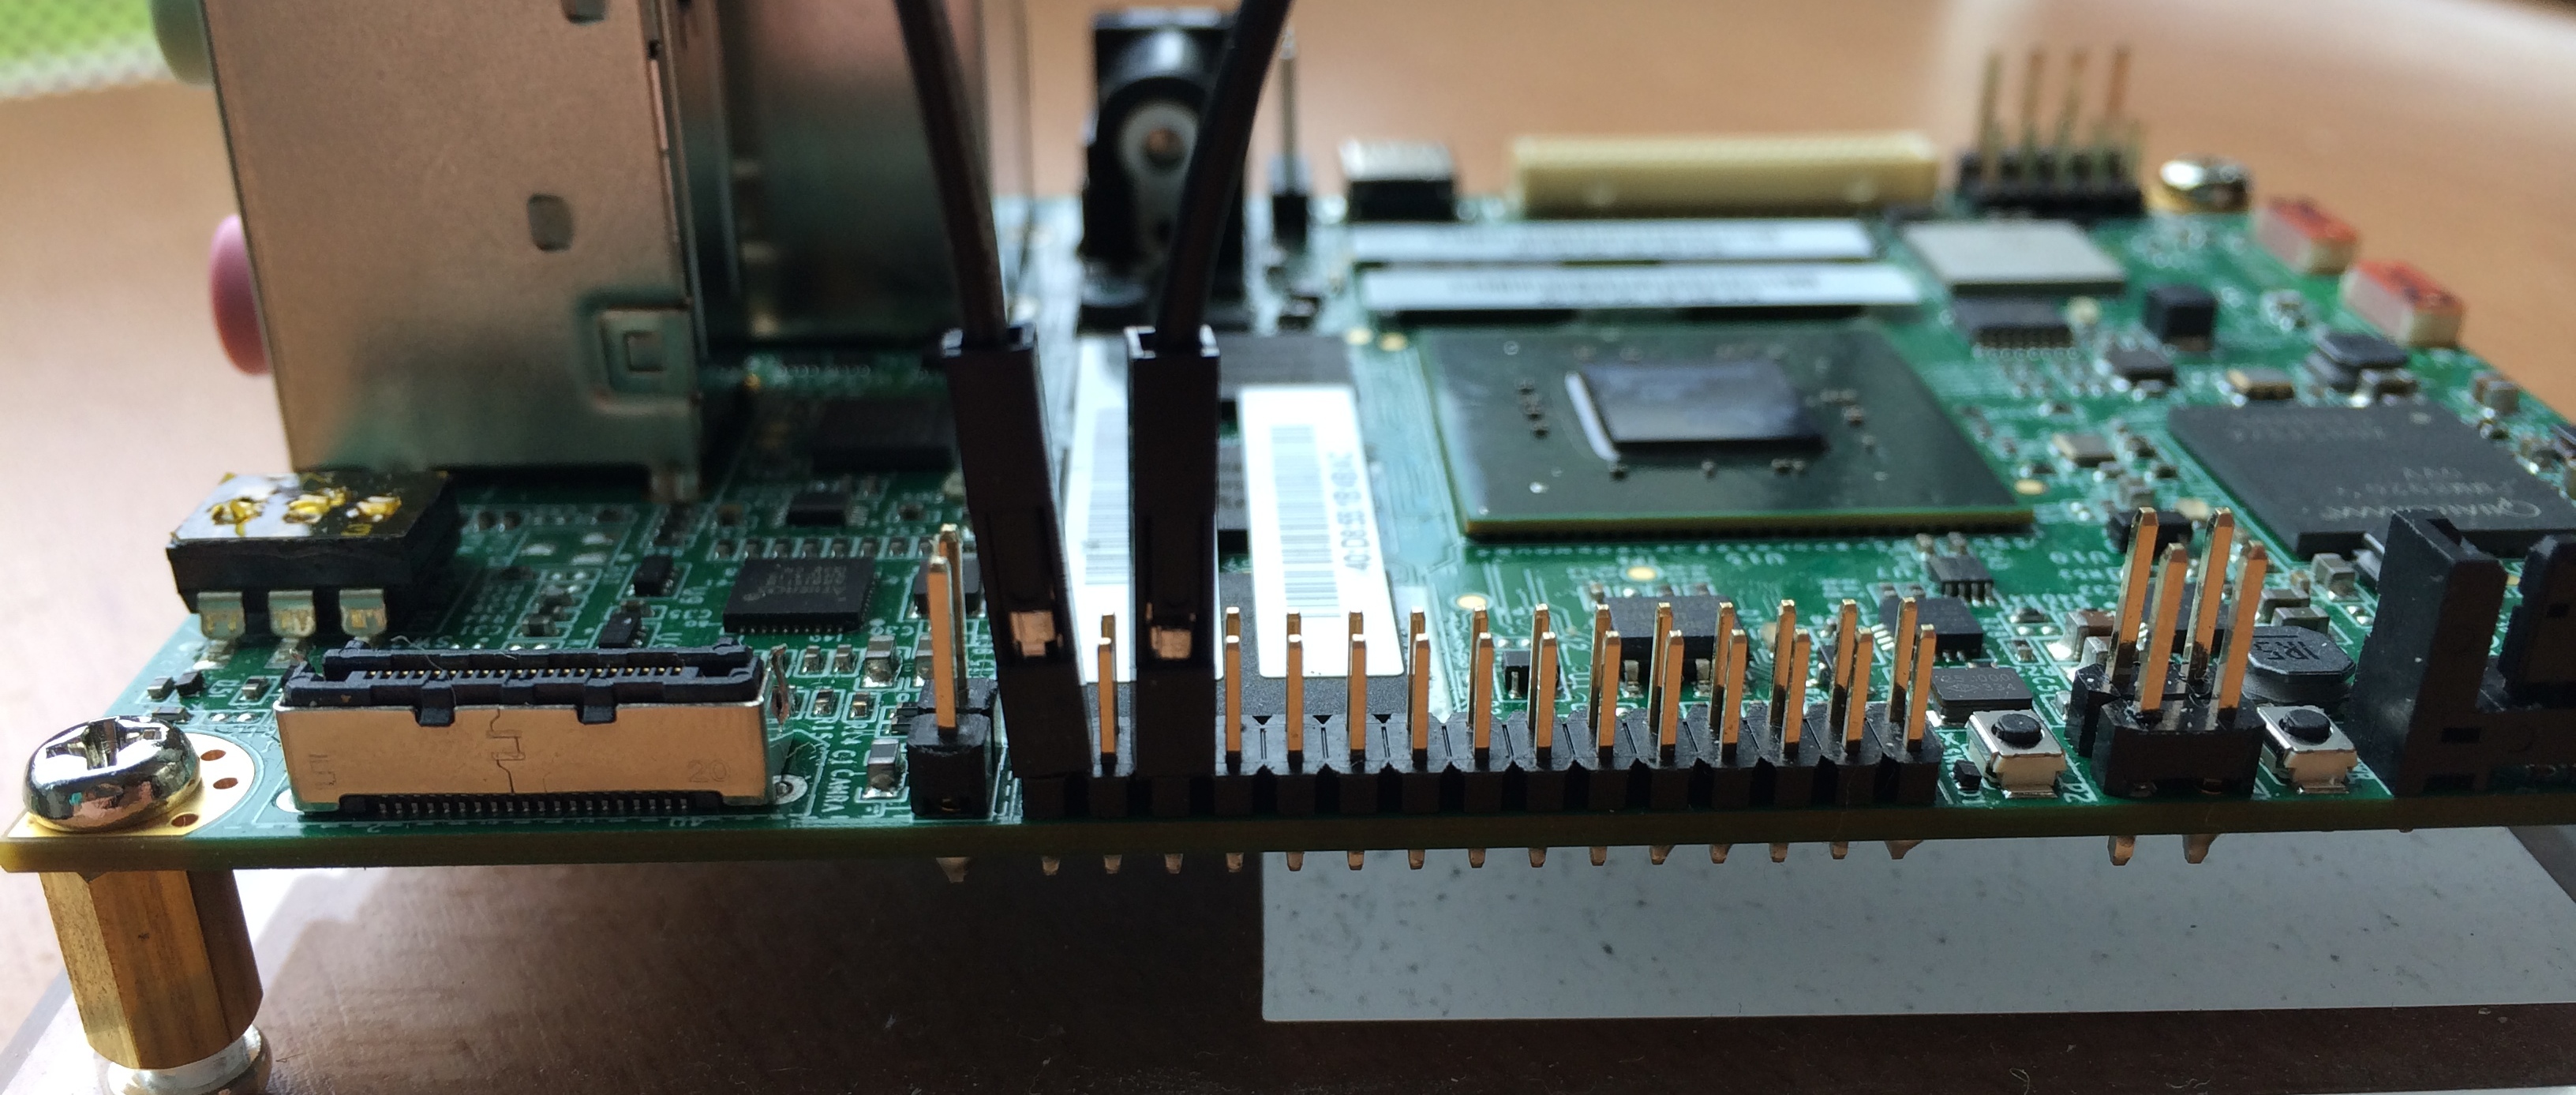
Boot the board into fastboot mode (make sure the board is unplugged from power and USB if it is already plugged in), so we can flash the images onto the board's internal storage partitions. To force the board into fastboot, you need to jump pins 26 to 30 on the expansion connector:
Plug in the board using the 5V power supply provided. (Note: make sure to use the power supply provided with the board, as the board has exhibited unpredictable behavior with other 5V power supplies)
Plug the micro USB cable into the port on the board, and the USB into your computer. Make sure to plug the board into power before USB. If you plug in USB first, the board will attempt to draw power over USB, causing unwanted behavior in the future (the USB connection will likely not work).
Check to make sure the board booted into fastboot mode and the computer recognizes it:
sudo fastboot devices
You should see something like:
a4cc69 fastboot
The first string will be different -- it is a hexadecimal string unique to your board. If you don't see this, your board has not successfully booted into fastboot. :(
Once the board has been successfully booted into fastboot mode, the boot and firmware images can be flashed onto the board.
Flashing the Boot and Firmware Images
To flash the updated boot and firmware images to the DragonBoard, run the following commands with the board in fastboot mode:
sudo fastboot flash boot boot-ifc6410-20140526-15.img

sudo fastboot flash cache firmware-ifc6410-20140526-15.img
The board now has the correct boot image in the boot partition, and the correct firmware image in the cache partition. Now we can install the root filesystem.
Installing the Filesystem on SD Card
There are two separate paths to follow based on your Ubuntu setup. If you are running Ubuntu natively, follow Section 3.1. If you are running Ubuntu on a Virtual Machine, follow Section 3.2.
Native Ubuntu: This tutorial will be the straightforward bringup process if you are running Ubuntu natively on your machine. If you have problems with copying the filesystem on this process, switch to the VM workaround.
VM Ubuntu: This tutorial is a workaround that allows you to bringup the board entirely on the eMMC flash and use the Linaro OS to prepare your SD card. Then you will update the boot image to startup from the SD card.